First of all, in this belajar design t-shirt, we always use this canvas setting to design. So, keep in your mind this in order to be easier to start next learn.
Open your photoshop program, press Ctrl+N. Re-arrange setting, Width: 2000px, weight: 2000px, Resolusion: 300px/inch, Color mode: CMYK. Press OK if you've done. Take a look at screenshots below. Remember, we always use this setting trough all learning design t-shirt in this blog.
Add solid color on canvas to make your own t-shirt's color. Click Layer > New Fill Layer > Solid Color. Pick your own color in pop up window. Press OK to finish.
Go and click on Layer on the right bar. Lock Color Fill 1 by pressing lock button. Right click on Background and delete layer.
Press Horizontal Type Tool (T) on the left bar. Set the font family as Stencil std. Have no font? Just download here a moment. Set the font style as bold and and font size as 48px. Choose Sharp for Anti-aliasing method.
Pick your own text color. In this case, I chose red.
Type word "Blogger" and this is look like.
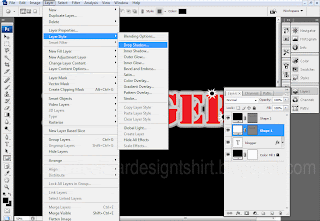
Give a Stroke style on text by pressing Layer > Layer style > Stroke.
Re-arrange the stroke setting. Size: 16px, Position: Outside, Blend mode: Normal, Opacity: 100% and color: #CCCCCC
Add Outer glow by pressing Layer > Layer style > Outer glow.
Re-arrange layer style setting. Blend mode: Normal, Opacity: 75%, Noise: 0%, Color: White, Spread: 0%, Size: 27px, Range: 1%, Jitter: 0%
Activate Custom Shape Tool (U) and choose shape starburst style.
Start to make some starburst style as many as you like on blogger text. Remember, press shift while you do this in order to make your starburst style still in one layer. If you're on the right way, the result's look like screenshot below.
Activate Ellipse tool, change the color in black and make a little black cyrcle on white starburst style shapes. Again, press shift while you do this in order to make your black cyrcle still in one layer. This action will make a shot bullet effect on text. This black cyrcle include in shape 2.
Add drop shadow on shape 1 or starburst shape style.
Make a new layer. Click or select Color Fill 1, press button create a new layer. Layer 1 created. Drag and dropping the layer above shape 2.
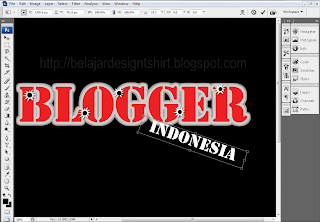
Type a word Indonesia on position shown on image below.
Press Ctrl+T to transform and set the text position like shown below.
Rasterize text Indonesia. Click Layer > Rasterize > Layer.
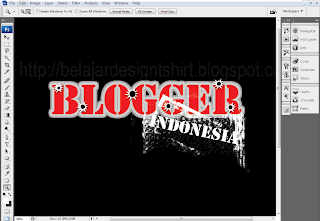
Activate Brush Tool (B) and choose brush style Sample Brush #18. Master Diameter 750. Don't forget to set brush color into white and start your own creation. Again, if you don't have Sample Brush #18, you can download it here.
If you're on the right track, you'll find the result such below.
At last bat not least, save this project in PSD File format for further edit and JPEG, Bitmap.GIF or another for ready in use to print. Keep on learning design t-shirt with belajar design t-shirt. See you next!


3 komentar:
Terus posting bro...
soalnya buat design T-Shirt aku masih amatir...
kali aja bisa nimba ilmu di blogmu...
thanks
Hehe...ngomong2 masalah amatir, gue juga amatir. Perlu percobaan beberapa kali baru bisa jadi satu post. Thanks atas supportnya. Next mungkin akan dilengkapi video tutorial dan PDF...do'ain ya!
wuih keren nih sob, kalo ku cuma bisa yg dasar2 aja photoshopnya...
Posting Komentar